Sunday, November 15, 2020

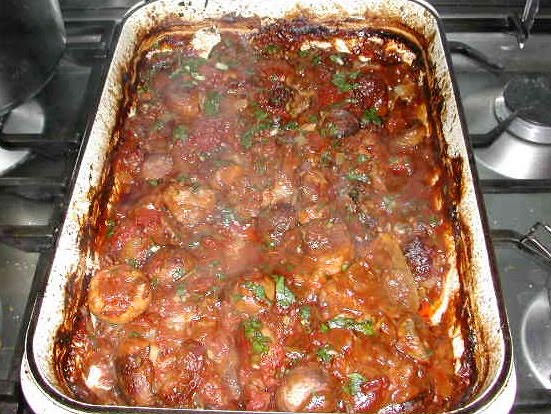
Braised Oxtail Pot Pies

This November in Perth has been very unseasonal for spring, in that it has been quite cold and very wet this month, In fact, we have received double the usual rainfall for the month and we still have two more weeks to go. So, I thought this would be a good opportunity to get one more slow-cooked comfort meal prepared before the BBQ season is upon us.

Whilst seeking out marrow bones at the local butcher for a beef stock I was planning on making, I came across an often-ignored beef cut, oxtail, and one I have not used for years. So I decided to buy them also and prepare them for tonight’s dinner.


Ingredients

500 gms oxtail cut into sections

1 Large diced onion

1 Large diced carrot

3 sticks diced celery

4 - 6 sliced mushrooms

3-star anise spices

2-3 garlic cloves crushed

1 cup Cabernet Sauvignon (save the remainder of the bottle for the cook.)

2 - 3 cups beef stock

Salt and cracked pepper

2 tablespoons extra-virgin of olive oil

2 tablespoons flour

1-2 tablespoons butter 

Butter puff pastry

Method

Lightly season in the flour with salt and pepper and put it into a plastic bag.

Remove excess fat from the oxtails and place them into the plastic bag and give it a good shake to ensure they are all coated with the seasoned flour.

Preheat your cast-iron casserole with the olive oil and brown off the seasoned oxtails.

Remove the oxtails to another container.

Add additional olive oil to the casserole and sauté the onion celery carrot mushroom and garlic.

Deglaze the casserole with the wine and cook off some of the alcohol. Add the star anise and return the oxtail to the casserole.

Top up the casserole with stock so that all the ingredients are covered. I like to place a cartouche on top to prevent excessive evaporation while cooking. Place the lid on the casserole and place it into a preheated oven at 170°C. The cooking time is between two and three hours. Check the casserole after an hour and a half to ensure the casserole does not dry out.

Test the oxtail so they are almost falling off the bone.

At this point, you can add about a tablespoon of butter to the remaining liquid to give a gloss to the sauce. If there is excessive liquid lightly cook it off so that the remaining liquid is a semi thick. It may require some cornflower to ensure you have a semi-thick sauce.

Once the casserole ingredients have cooled place them into individual pots or pie dishes.

Cut the pastry to the shape of the individual pots so that each pot can be sealed with the puff pastry. Lightly glaze the pastry with an egg wash and make a small hole on top of the pastry to allow any excess heat to escape.

Place the pie pot/s into a pre-heated oven at 220°C and bake for approximately 30 minutes or until golden.

Enjoy the remaining wine. 😉

Tuesday, June 5, 2018

Chicken Stock Recipe


As I am writing this blog, the stock is slowly bubbling on the stove and the aroma is permeating through the kitchen and into my office. Nothing beats homemade chicken soup on a cold winters day like today. With storms forecast for the next few days, it is time to stay indoors and make some stock. One of our family favourites is chicken stock: also known as Jewish penicillin, winter elixir, broth of life and no doubt there are many more nicknames.
The secret ingredient to my mind is making the stock yourself by choosing and preparing the freshest ingredients, not as a chore but done with good intent and a positive mindset. Doing the preparation mindfully, slowly and with love. Having said that I give thanks for the love of cooking and inspiration given to me by my Dad and Baba K.
Slow cooked comfort food is one of the joys of winter.

Chicken Soup/Stock
Ingredients:
Chicken
6 stalks celery
4 brown onions
1 tbs Himalayan salt
5 sprigs Parsley
3 sprigs thyme
6 peppercorns
2 Bay leaves
2cm Ginger (optional)
2 Long Chillies (optional)
1-star anise (optional)
Water about 4 litres (enough to ensure the chicken is covered)

Options with the chicken:
I’ve used a whole uncooked chicken in my recipe however, it can be quartered or even roaster as can the onion and carrot if you prefer a coloured stock.
If you want to save the chicken meat to add to your soup or sandwiches or salad etc, remove the chicken from the stock after two hours let it cool slightly, peel away the meat and return the carcase to the stock and continue to simmer for at least another two to four hours.

Method
Add all the ingredients to a large stockpot and bring it to just below boiling point.

Gently simmer with the lid on for at least two hours in the early stages skim off any scum floating on top.

Remove chicken if you want to save the meat for soup or another recipe see above.

Add additional water if necessary to ensure chicken is covered and continue to let the stock bubble away for another few hours, the longer the better.

Let the stock cool then strain the liquid into large bowl cover and leave it in the fridge overnight.

Next morning gently remove any fat and either freeze the remaining stock or use it for your soup recipe.

My Chicken Soup ingredients recipe
1 x     Leek
2 x     Brown onions
2 x     Carrots
3 x     Celery Stalks
1 x     Cup diced or shredded chicken (optional)
½x    Cup alphabet pasta or risoni or make some matzo balls

Method
Dice all the vegetables and gently sauté them in a tablespoon of butter or oil till they are softened.

Add the stock and bring the stock to the boil.

Add pasta or matzo balls and simmer till tender about 10 – 15 minutes.

Serve with crusty bread.

Bon Appétit

Saturday, September 21, 2013

Mini Kolokithopitas (Zucchini pies)

Traditional Kolikithhopita ingridients may include filo pastry with lashing of butter. Trying to get away from pastry I choose to omit this ingredient. Also any type of squash can be used instead of zucchini  eg pumpkin.

Zucchinis must be plentiful this time of the year as my local providore of fruit and vegetables was just about giving them away. So I decided to try a few of the ones I puchased to make this recipe. There are a number of ways this can be prepared. Baking as a loaf or in individual serves in a muffin tin or made into individual patties and fried. I choose to try the healthier version baking individual serves in a muffin tin.

Ingredients

2  zucchinis grated
2 eggs
1 brown onion finely diced
2 garlic cloves crushed
2 bacon rashes diced (optional)
200 grms Feta grated or crumbed
½ cup Panko bread crumbs or fresh bread crumbs
½  cup Italian flat leaf parsley finely chopped
¼  - ½ tsp dried dill or dried oregano
Salt and Pepper

Pre-heat  your fan forced oven to 200 C. I also preheat a granite pizza slab at the same time. The pizza slab will provide a good source of heat for the bottom of the muffin tin. I used a large muffin tin for these pies which is sprayed with olive oil and set aside while the oven is heating.
Grate the zucchini and sprinkle it with salt and let it rest it in a colander to drain for 10 minutes. Then rinse with clean water  and squeeze out any remaining liquid.
Lightly sauté the onions, garlic and bacon and allow to cool.
Beat the eggs in a large bowl and combine all the ingredients ensuring everything is evenly mixed.
Using a spoon fill the muffin cups to the top.
Bake for 25-30 minutes, then test to see the mixture has set.
Alternatively you can shape the mixture into patties dust with plain flower and shallow fry in olive oil. Drain on a paper towel before serving.

Serve with Tzatziki  sauce or Greek yoghurt

Monday, April 15, 2013

Vegetarian Tuscan Kale and Bean Soup

I love my green leafy vegetables and recently have become a fan of using Kale in a few recipes. I have used it in stir frys, steamed and even made kale chips. Kale is member of the Brassica family which includes cabbage and broccoli. There are lots of powerful nutrients contained in this leafy green vegetable which puts it into the super food category. For more information on the benefits of adding this vegetable to your weekly menu check out this web site. http://www.webmd.com/food-recipes/features/the-truth-about-kale

Last weeks hunting and gathering exercise at Fresh Provisions included a large bunch of fresh Kale, celery and an assortment of organic tinned items which formed the basis of the easiest, most nutritious and nourishing soup you will ever make. This recipe will make about 8 - 12 serves and any leftovers always taste better the next day.

1 bunch Kale
2 onions diced
4 cups celery diced
1 cup sweet potato diced
1 potato diced
2 tomatoes diced
4 cloves garlic crushed
1 x 400 grm  tin Organic 4 bean mix
1 x 400 grm tin butter beans
1 x 400 grm tin crushed tomato
1 x Massel stock cube (salt reduced)
1 tbs soy sauce (salt reduced)
1- 2 litres water
Sourdough bread for crouton garnish

Wash the Kale and strip off all leaf from the stalk. Chop the kale to a consistency to your liking.
Empty the contents from the cans of beans and then rinse them thoroughly.
Add a few tablespoons of olive oil into a large stock pot and saute the onions,celery, potato, adding the garlic after a few minutes. Then add the Kale and fresh tomato. After a few more minutes the Kale will start to collapse then add the remaining ingredients. Add enough water to fully cover the ingredients. Bring to the boil and simmer in a covered pot for 30 - 45 minutes.
Toast the sourdough bread and rub the slices with fresh garlic and then dice into croutons.
Serve with grated Parmesan cheese and season to your liking.
Bon Appetit!


Friday, October 19, 2012

Braised baby goat pithiviers (Posh Pies)


If you are a meat lover you should consider eating more goat meat. Did you know goat has more protein than beef, it’s lean and lower in fat than chicken and contains lower calories than beef chicken and pork. And that’s why it has become of my favourite meats. On my last visit to Princi Butchers in North Perth I was able to buy some marinated baby goat on the bone and could not resist getting some to prepare this recipe which I adapted from Chef Ashley Martin’s recipe for goat pithiviers as seen in SBS TV.

Ingredients – 16 portions
1 kg marinated baby goat meat on the bone
2 diced onions
2 celery sticks diced
1 carrot diced
2 garlic cloves crushed
Sprig of thyme
Bay leaf
800 gms crushed tomato
200 ml dry white wine (Galafrey Sauvignon Blanc)
2 cups chicken stock or water (as needed)
 olive oil salt and pepper
6 sheets Pampas puff pastry
1 egg separated. (White for sealing pastry. Yolk for glazing pastry.)
Nigella seeds - optional

Preparing the ragu
Heat some olive oil in a heavy based casserole. Sear several portions of goat meat at a time without over crowding the pan. Cook each until brown then set aside in another container.

Add another dash of olive oil to the heavy based casserole and then add onion, celery, carrot, garlic, thyme and bay leaf. Cook this till it begins to soften. Then add the dry white wine and cook for 5 minutes allowing the wine to reduce by half.
Return the goat meat to the vegetables and add the crushed tomato ensuring everything is evenly mixed and covered. If necessary add enough stock or water to cover the mixture. Season it to taste. Cover the liquid with baking paper and place a lid on the casserole.
Cook slowly for about 2 hours making sure the mixture is covered in liquid at all times.
Allow to cool and remove all the meat portions from the casserole. Remove the meat from the bone and dice into 1-2 cm pieces and return it to the casserole. There should be sufficient liquid to cover the meat by 1-2 cm. If there is too much liquid it can be skimmed and used later as a reduction to serve as a sauce for the pithiviers.
Cool the casserole and place it in the fridge overnight. The next day the casserole (pie filing) will be set in its own jelly ready for filling the pithiviers.

Making the pithiviers
Using an 11 cm round pastry cutter, cut out 36 rounds in the puff pastry. Spoon 50g of the cool goat and vegetable mix in the center of the pastry circles (use a 9cm ring to center and support the mixture).  For the pastry tops you can make a few 1 cm cuts in the centre of each top to allow for steam to escape. Brush the edge of the circle of each top with the egg white and place this side on top of the goat mix and press around the edges on the pastry with a fork.
Brush the pithiviers with the egg yolk and bake in a hot over for approx 30 minutes. I sprinkled nigella seeds on the tops.

Serve with the sauce made from any leftover liquid or tomato ketchup.

Sunday, February 12, 2012

Banana and Walnut Bread


Bananas are in season at the moment and as we had a few over ripe ones in the fruit bowl so I decided to make a healthy version of banana bread. Bananas one of natures best nutritional power-packs, they are a good source of fibre, high in potassium, low in salt which helps keep the blood pressure down. They also contain vitamin B and C and they are  fairly low on the GI index so no high sugar spikes. By adding wholewmeal flour and walnuts to the mix you have the extra benefit of more fibre and omega 3 fatty acid in the recipe which is good for the digestion and a healthy heart. This recipe will provide 10 to 12 slices of banana bread which if not consumed in one sitting  can be frozen to be enjoyed later in the lunch box or afternoon snacks.


Recipe
2 cups wholemeal self raising flour
1/3 cup brown sugar
100 gms chopped walnuts
2 eggs beated
1 cup low fat or skim milk
3 ripe bananas
1 tsp bi-carb soda
pinch sea salt

Pre heat a fan forced oven to 180 C.
Mix all the dry ingredients in a large bowl.
Mash the bananas in a separate bowl and combine with the beaten eggs and milk.
Fold in the wet ingredients with the dry ensuring they are evenly mixed. Add the mixture into a prepared loaf tin lined with baking paper. Bake for 45 minutes or until until a skewer is inserted into the middle comes out clean. When baked remove the loaf from the tin and allow it to cool on a rack for several minutes before slicing. Enjoy your healthy bread in moderation with a cuppa with a friend.

Friday, September 30, 2011

Thai Chicken Sausage Rolls

This is another twist on an earlier Blogg posted 27th October 2009 "Healthy Sausage Rolls." I served these some time ago at a family gathering and judging by the way they were devoured by the crew I'm sure they enjoyed them. So I'm happy to share the recipe with anyone who may be interested. 


  • 500 grams chicken mince (Try to get Mt Barker Free Range or mince some of their chicken breasts)
  • 2 eggs (1 for mixture and 1 for pastry)
  • 1 tbs fish sauce
  • 1 medium red onion finely diced
  • 1 red chilli finely diced
  • 1 medium carrot grated
  • 1/2 cup coriander chopped
  • 3 cloves garlic minced
  • 1/2 cup Panko bread crumbs
  • 4 sheets Pampas reduced fat puff pastry
  • Cumin seeds for sprinkling on top of sausage rolls

Preheat a fan forced oven to 200C.
Thaw the puff pastry and cut each sheet diagonally in half.
Line a baking sheet with baking paper.
In a large bowl add the chicken mince, one egg, onion, chilli, carrot, garlic, coriander and using your clean hands thoroughly mix the ingredients. Add the bread crumbs to bind the mixture.
Using your hands roll a portion of the sausage mixture to a cigar shape about the size of a bbq sausage and place it on the edge of the ½ sheet of pastry. Brush the opposite edge of the pastry with egg wash and roll the pastry into the sausage roll shape.
Cut the sausage roll into portions. I divide a single roll into 6 portions. (1 full sheet yields 12 portions)
Brush all the tops of the sausage rolls with the remaining egg wash and sprinkle with cumin seeds.
Bake for 20 – 25 minutes until golden brown.
Serve with a sweet or hot chilli sauce dip.

Friday, June 25, 2010

Sticky Date Pudding


Sticky Date Pudding (8 serves)
1 ½ cups pitted dried dates chopped
1 ¼ cups water
1 tsp bicarb soda
¼ cup butter
2 eggs
1 tsp vanilla essence
1 ½ cups self raising flour
2/3 cup brown sugar

Caramel sauce
¾ cup brown sugar
300ml cream
2 tbs Golden syrup
30g butter

In a small saucepan add the dates and water and bring to the boil. Turn off the heat and add the butter and bicarb soda stirring the mixture. Set this aside until cool.

Preheat a fan forced oven to 160˚C.

Prepare a 20 cm round spring form cake tin with baking paper on the base and spray the sides with oil or grease with butter.

Pour the cooled date mixture into a food processor; add the eggs and vanilla and pulse for a few seconds.

In a large bowl sift the self raising flour and brown sugar to remove any lumps.
Add the date mixture and using a wooden spoon or large spatula fold the wet and dry ingredients together until evenly mixed. Try not to over mix the ingredients.

Pour the mixture into the cake tin and bake for 50 to 60 minutes. After 40 minutes check to see the top of the pudding is not getting to brown - cover the top with baking paper if necessary.

Test the pudding with a wooden skewer – the pudding is cooked when no batter appears on the skewer.

At this stage make your caramel sauce in a small saucepan adding all the ingredients and simmering for about five minutes.

Remove the pudding from the cake tin and allow the pudding to cool on a wire rack. As the pudding cools use the wooden skewer to pierce the pudding making about 10 holes in the pudding. Pour about ½ a cup of the caramel sauce over the top of the pudding. Adding a little bit more will result with a stickier pudding.

Serve hot or cold. I prefer to reheat the pudding and sauce and serve with a dollop of fresh cream or vanilla ice cream.


Braised Lamb Shanks


With the cold of winter setting in I have been hanging out for some good old fashioned comfort food. One of my favourite comfort meals is lamb shanks which are braised slowly in a cast iron baking tray or casserole. For this recipe I used Frenched lamb shanks. (Shanks which have been trimmed to remove excess fat and tendon) Not only do they look nicer on the plate but are a healthier option with reduced fat. Braising meat is an excellent slow cooking method for tougher cuts of meat as it keeps the meat moist. Braising involves dusting the meat in seasoned flour then browning it in a pan in oil and finishing the cooking process by slow cooking with liquid such as stock, in a casserole. This final process can be done in an oven, stovetop or electric slow cooker.

Braised Lamb Shanks
3 tbs olive oil
2 brown onions diced
4 garlic cloves crushed
2 carrots diced
4 celery stalks diced
1 cup flour seasoned with salt and pepper
8 lamb shanks
1 can diced tomato
1-2 cups chicken or vegetable stock
2 bay leaves
Sea salt and pepper

Preheat your oven to 180 C.

Toss the lamb shanks into a large bowl containing the seasoned flour ensuring the shanks are evenly coated.

Heat the olive oil in a frying pan and brown the lamb shanks in small batches and transfer the shanks into a heavy based baking dish or casserole.

Lightly sauté the vegetables in the frying pan adding additional oil if necessary. And add 2 tbs of the seasoned flour to the mixture coating the sautéed vegetables.

Add the diced tomato to the frying pan and heat through then transfer the contents into the baking dish coating the lamb shanks.

Deglaze the frying pan with the stock and bay leaves and pour the stock over the lamb shanks to just cover them. Adjust the stock to suit the size of your casserole and quantity of ingredients.

Cover the baking dish with foil and place it into the preheated oven to bake for 1 hour at 180°C then reduce the heat to 160°C for another 1½ to 2 hours or until the meat begins to fall off the bone.

Serve with potato mash, steamed green vegetables and remaining sauce from the braised lamb shanks.

Wine: Penfolds Bin 407 Cabernet Sauvignon 1998 and Parker Terra Rossa Cabernet Sauvignon 2005


Saturday, May 29, 2010

Baba's Chicken Soup

That's the last of the Baba's Chicken soup:-(

Last week my daughter, The Truffle, rang from work saying she was feeling poorly with a stubborn cold that had nagged her for most of the week.  With a little encouragement from her mother, the naturopath, she agreed it would be best to stay home the next day to give it a chance to clear over the weekend.  I decided I would lend a hand by preparing some soup for the next day for her lunch and make enough for leftovers for dinner for her and her hubby Long_mach.
One of nature’s best food remedies for anyone unwell with cold and flu symptoms is; Jewish Penicillin commonly known as chicken soup. Ideally, the chicken stock is not made from processed stock powder but made the way the grandma would have made it – with love and using fresh preferably organic or at least free range chicken, with selected vegetables. For my magic master stock, I employ a two part process: firstly lightly simmering the whole chicken and vegetables, followed by straining the stock and letting it set overnight in the fridge allowing any fat to set on top – to be removed before adding to the fresh soup ingredients.
Master Stock Ingredients
1 Whole organic or free range chicken
2 Carrots
4/5 Celery stalks with some leaves left on
2/3 Sprigs parsley
2 Brown onions
2 Long red chilies
4 cm Piece ginger
2 Cloves garlic
2 Bay leaves
1 tsp Sea salt and several pepper corns
Wash the whole chicken and place it in a large stockpot with all the remaining ingredients. Fill the stockpot with water to just cover the chicken and vegetables. Bring the stock to the boil and turn down the heat to a gentle simmer. Simmer for 1 to 1 ½ hours. Remove the chicken and set aside to cool. Strain the stock through a clean tea towel or muslin. Discard all the vegetables. Once chicken and stock is cooled store them separately in the fridge overnight.  Next day remove any fat from the top of the stock. Remove the skin from the chicken and shred the meat from the bones to be added to the soup. I usually save the legs for sandwiches or add into a fried rice dish. The white meat is finely shredded or diced for the soup.
Soup Ingredients
2 cups Onions diced
2 cups Carrots diced
2 cups Celery diced
1/1 ½ Litres chicken stock
1 cup rice or risoni
2 cups chicken diced or shredded
½ cup finely chopped parsley
1tsp Extra virgin olive oil
Sea salt and ground pepper season to taste
Gently sautĂ© the trinity of onions, carrots and celery for approximately 4-5 minutes. Add about 1 – 1 ½ litres of chicken stock. Bring to the boil and simmer for 30 minutes. Add the rice or risoni and ¼ cup of parsley simmer for 15 minutes. Then add the diced chicken for several minutes to heat through. Season to taste and serve garnished with the remaining parsley.


Monday, May 17, 2010

Osso Bucco


Winter is approaching and as the weather is getting cooler in the afternoons and evenings I tend to focus my cooking on soups, roasts and other slow cooked meals. One favorite recipe is Osso Bucco. My first encounter with this recipe was when I was cooking in the SAS Officer’s Mess as part of my National Service Training.  Santo Ferarra, a civilian cook employed at the Mess, was my mentor and taught me all the tricks of the cooking trade including how to make this dish. Back then we would have used beef shin instead of veal and this works perfectly, it just may require a bit more cooking.  Fortunately now we have good supplies of veal in our supermarket and local butchers so I recently stocked up in anticipation of making this recipe.
Long_mach and the truffle were coming over to share Sunday dinner so it was an opportunity to make this recipe and also have a go at making the Master Chef recipe CrĂšme Brulee. Happy to say the Osso Bucco and accompanying wine was a success. Unfortunately the CrĂšme Brulee did not set, so it will be back to the test kitchen to see what went wrong – I’ll try again and post of the recipe when I have nailed it!
Osso Bucco
Ingredients (Serves 4)
4 centre bone cut pieces of veal Osso Bucco (approx 800gms)
½ cup plain flour seasoned with sea salt and ground pepper
4 tbs extra virgin olive oil
100gms butter
2 brown onions diced
2 celery stalks diced
1 carrot diced
3 cloves garlic diced
1 cup dry white wine
2 tbs tomato paste
2 x 400gms tins diced tomato
1 cup chicken stock
2 sprigs fresh thyme
200 gms Button or Swiss brown mushrooms
2 bay leaves
Sea salt, ground black pepper

Gremolata
1 bunch flat-leaf parsley finely chopped
1 clove garlic finely minced
1 lemon zest finely minced
Salt and freshly ground black pepper, to taste
Preparation
Preheat fan forced oven to 180°C. 
First make your base – the ‘Holy Trinity’ or ‘soffritto’ (used in most soup and casserole recipes and consist of onions, celery and carrot lightly sautĂ©ed in oil and butter.)
Add half of the olive oil and butter to a large baking dish or cast iron casserole and lightly sautĂ© the onion, celery and carrot – remove and set aside.

Dust veal portions in seasoned flour.
Add the remaining olive oil and butter to the baking dish and lightly brown the floured veal portions - remove and set aside.

Deglaze the baking dish with white wine and when the wine is nearly fully reduced add the tomato paste and cook for a minute then add the canned tomato, vegetables and veal.
Add the stock, bay leaves, thyme and seasoning - if necessary add additional water to just cover the Osso Bucco.

Bring to the boil, and then cover the baking dish with foil or casserole lid and place into the pre heated oven for 1.5 to 2 hours. Check the veal for tenderness and adjust cooking time until the veal falls off the bone. Check seasoning adding extra if necessary. If there is too much liquid do not replace foil or lid to allow any excess liquid to reduce to a nice sauce consistency.

Prior to serving stir through the gremolata.

Serve with mashed potato and steamed green vegetables.

Beverage: Fraser Gallop 2008 Cabernet Merlot.

Sunday, May 9, 2010

Fast Ed’s Basic Muffin Recipe


One of my favorite TV foodie presenters is Ed Halmagyi who is a regular on channel 7’s Better Homes and Gardens. Watching him the other night presenting his basic muffin recipe got me motivated to give his recipe a try.  Over the years I have tried heaps of muffin recipes and can honestly say this one may not be the healthiest – but it is foolproof, makes the lightest, best tasting and long lasting muffins I have ever made. When I made my first batch of muffins I divided the wet mixture into 2 even batches.  Adding 1 diced Granny Smith apple into one mix and 1 large mashed banana into the other;  Finishing up with 6 apple and 6 banana muffins.  Looking back at the finished product I could have added a little more apple into the mixture thus enabling me to fill these muffin cases to the desired ¾ level.

Fast Ed’s Basic Muffin Recipe (12 large muffins)

350 gms self raising flour
140 gms caster sugar
1tsp baking powder
¼ tsp salt
200 mls milk
140 mls vegetable oil
1 tsp vanilla extract

Sift all the dry ingredients a couple of times. In a separate bowl mix all the wet ingredients ensuring the vegetable oil is thoroughly emulsified. Pour the wet ingredients into the dry and gently mix them together using a silicone spatula – do not over mix.

To add texture and extra flavour to your muffins add about 1½cups of any of the following ingredients: diced apple or pear, mashed bananas and walnuts, frozen blueberries, chocolate chips are just a few to get you started. I could just imagine how delicious some good white chocolate would taste using this recipe – maybe next time.

Add your chosen filling to the wet mixture gently mixing it through. Then ¾ fill each of the paper muffin cases and let them rest for 5 minutes so they form a crust, this will assist them to rise better. Bake in a pre-heated fan forced oven at 190C for 20-25 minutes or until a tooth pick comes out clean from tested muffin. 

Enjoy with your morning cup of tea or coffee.

Wednesday, May 5, 2010

Apple Tart – Tarte aux Pommes


Apple Tart – Tarte aux  Pommes  (25cm Tart)
New seasons Granny Smith apples were the inspiration to try this dessert recipe for our Sunday family gathering last week.  The tart is made from short pastry, with a frangipane filling and new season Donnybrook Granny Smith apples. This was my first attempt at making this recipe and while it seems fiddly and is a bit time consuming the effort was well worth it.
Short crust Pastry - Pùte Brisée Ingredients
11/3  cups plain flour
¼ tsp salt
½ cup soften butter
1 egg yolk
2-3 tbs cold water
Frangipane Ingredients
½ cup  softened butter
½ cup caster sugar
1 egg beaten and 1 egg yolk
150 gms ground almonds
1 tbs brandy
2 tbs plain flour
Topping
4 medium Granny Smith or Golden Delicious apples  - peeled, cored and sliced about 12 slices per apple (Squeeze some lemon juice over the cut apples to prevent them browning)
1 tsp caster sugar to caramalise top
2 tbs Apricot Jam for glazing the tart

Make your short crust pastry using a food processor. I prefer to do it manually with a pastry cutter. In a large bowl add the flour and butter using the pastry cutter and cut in the butter and flour until it resembles medium crumbs. Add the beaten egg and water and using your hands bring the pastry together to form a flattened ball. (Do not over work the pastry)  Wrap in cling wrap and refrigerate the pastry for at least half an hour.

While the pastry is resting make the frangipane. Cream the butter and sugar ensuring the sugar is dissolved and the mixture is creamy - gradually add the egg mixture continuing to whisk the mixture. Stir in the brandy and flour using a spatula.

Roll out the pastry between 2 sheets of baking paper to a 30cm circle. Spray the tart tin with oil and place the pastry into the tart dish pressing into the fluted sides of the dish. The pastry base and sides need to be pricked evenly with a fork all over to prevent the pastry rising while baking. Refrigerate the pastry until firm about 3o minutes.
Preheat oven to 200C fan forced and also your baking sheet. (Preheating the baking sheet will assist the tart base baking evenly).

Remove pastry from refrigerator and spoon the frangipane evenly over the tart base. Arrange the apples in a spiral pattern so they overlap each other around the tart also pressing them into the frangipane mixture.  

Place the tart on the preheated baking sheet and bake at 200 C or 20 minutes until the tart starts to brown. Then remove the tart and gently sprinkle 1tsp caster sugar evenly over the apples and return to the oven at 170C for another 10-15 minutes until the apples caramalise.

Remove the tart from oven and cool on a rack. Prior to serving dissolve the apricot jam in a tablespoon of water and brush over the apple tart. Serve with whipped cream or ice cream.


Tuesday, May 4, 2010

Cabbage Rolls


Cabbage Rolls (Recipe makes about 16 rolls)

The cabbage at the green grocers looked so fresh and healthy that I couldn’t resist buying the whole instead of the usual half. Having done so, I then had the dilemma of what to do with a whole cabbage when there are only generally two of us to eat any meal. First recipe that came to mind was cabbage rolls as seen in a TV program with Martha Stewart featuring her late mother making cabbage rolls. That immediately brought back memories of my own childhood and my mother making the rolls as a regular part of our diet. Not only were they traditional Polish fare but I’m guessing the cabbage was home grown and mince was an affordable protein. Also if there were any leftovers they could be frozen and reheated for future meals.  Cabbage rolls or Golabki (little pigeons) is a traditional Polish dish but it is also found in the cuisine of many other Eastern European countries. Traditionally white rice is used; however, I have chosen to use brown rice because I like the wholesome nutty texture.
Ingredients
1 large head of green cabbage, centre core removed
400gms minced beef (combination of pork and beef is the traditional option)
100gms diced bacon
2 cups cooked brown rice
1 cup diced onion
1 cup diced celery
½ cup chopped parsley
3 cloves garlic finely diced
1 cup ketchup
2 cans crushed tomato
1 can water (add extra water if required to cover rolls)
1 tbs brown sugar
Salt, pepper
Bring a large pot of water to the boil and immerse the whole cabbage. Cook gently till all leaves are tender and start to separate. While still simmering carefully remove the individual leaves as they fall off into the water.  You will need about 16 leaves. Cool the cabbage leaves in cold water. Cut the thick membrane off the back of each leaf.
Sauté onion, celery, garlic and bacon in a little butter until lightly browned.
Put all the uncooked meat into a large mixing bowl.
Add the sautéed onions and bacon.
Add seasonings, parsley, ketchup and the cooked rice.
Mix all the ingredients thoroughly using clean hands.
Lay out leaves and depending upon their size, place 1-2 tbs of meat and rice mixture on the wider side of the cabbage leaf.
Roll leaf up over the meat, folding in sides of leaf, and continue to roll.
Line the base of your cast iron casserole or baking dish with the discarded outer cabbage leaves.
Place cabbage rolls, seam down, onto the leaves at the base of the cast iron casserole.
Mix together the crushed tomatoes, water and brown sugar and pour evenly over all the rolls. Cover the cast iron casserole with more cabbage leaves and bake at 170C for 1 to 1 ½ hours.
Note: after baking for ¾ hour, check liquid, adding additional water as necessary.
To serve: spoon sauce over rolls. Another options is to serve with a side dressing of light sour cream.
Leftover rolls can be frozen up to 3 months.
Beverage; 2009 Rosemount Limited Edition Chardonnay